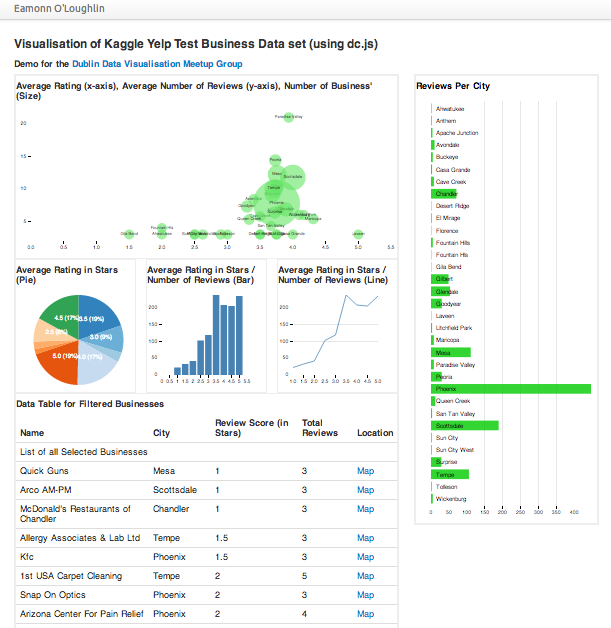
How to use dc.js to quickly (and easily!) create visually impactful interactive visualisations of data. In an afternoon. Something like this interactive visualisation.
Often it is desirable to create a visualisation of a dataset to enable interactive exploration or share an overview of the data with team members.
Good visualisations help in generating hypothesis about the data which can be tested / validated through further analyses.
Desirable features of a such a visualisation include: accessible via browser (anyone can access it!), interactive (supports discovery), scalable (a solution suits datasets of multiple sizes), easy / quick to Implement (good as a prototype development tool), and flexible (custom styling can emphasis important features).
The process for creating an exploratory visualisation usually looks like this:
- Explore Data & Data Features
- Brainstorm Features / Hypothesis about patterns
- Roughly Sketch Visual
- Iteratively Implement Visualisation
- Observe Users interacting
- Refine, Test, Release
When first working with a dataset, understanding how it will be useful is a primary objective. Rapidly iterating through the process outlined above can help us understand it’s usefulness very quickly. Access to the right tools can help us in rapidly iterating through this process.
That is where Dimensional Charting (dc.js) comes in. dc.js is a neat little javascript library that leverages both the visualisation power of Data Driven Documents (d3.js) and the interactive / coordination of Crossfilter (crossfilter.js).
dc.js is an open source, extremely easy-to-pick-up javascript library which allows us to implement neat custom visualisations in a matter of hours.
This post will walk through the process (from start to finish) to create a data visualisation. Today, the emphasis is to very quickly arrive at an opinionated visualisation of our data that enables us to explore / test specific hypothesis. In order illustrate this concept, we will use a simple dataset taken from the yelp prediction challenge on Kaggle. Specificlly we will be using the file yelp_test_set_business.json.
(Step 1) Explore Data & Data Features
The data we’ve chosen for this visualisation is json, has one object per business and each object is structured according the the following example:
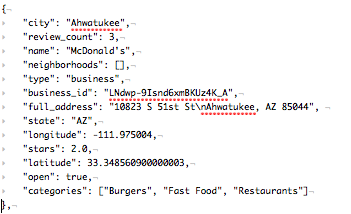
The full dataset contains approximately 1,200 business, all located in Arizona. Let’s assume we are interested in exploring the difference between cities, for example, the review count and average ranking by business per city. The features important for this will be (1) City, (2) Review Count, (3) Stars (Rating), (4) Location and (5) Business ID.
(Step 2) Brainstorm Features / Hypothesis about patterns
Quick Brainstorm (of desirable hypothesis or questions):
- Which cities have a high number of businesses than others?
- Do specific cities have higher rated businesses than others?
- Do certain cities have a higher average number of reviews per business?
- Are their cities with very low number of reviews?
- What proportion of businesses in a city are 1-star compared to 5-star?
- List the highest / lowest rated business for a specific city (for anecdotal exploration)
(Step 3) Roughly Sketch Visual
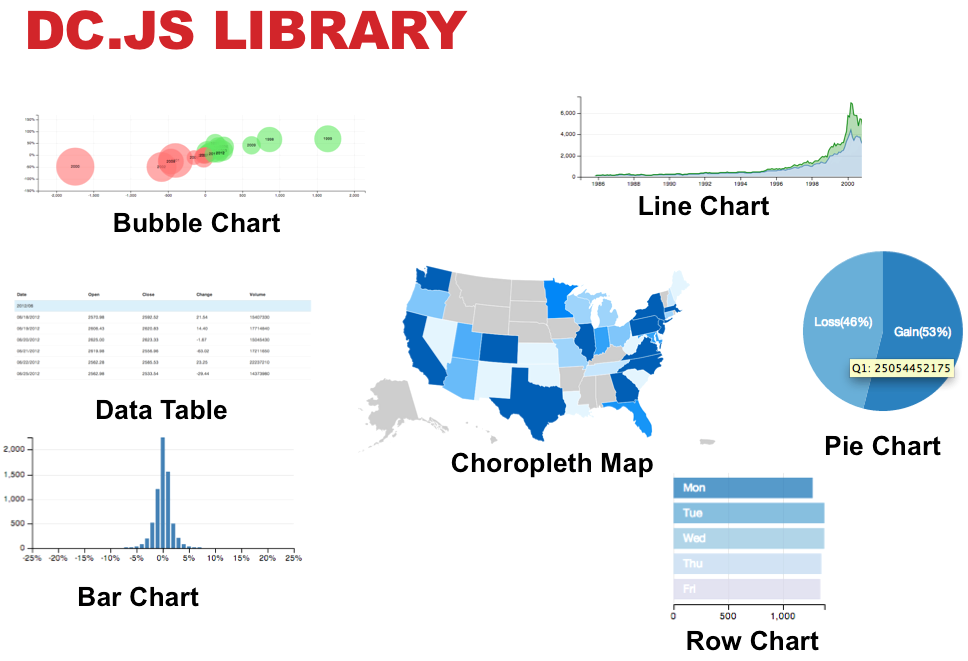
Based on the above, it seems like a grouping comparison by city, with a drilldown into specific features (rating, number of reviews, list of specific businesses would be useful). So our visualisation will have to hit all these objectives. Within dc.js, we have the option of the following charts.
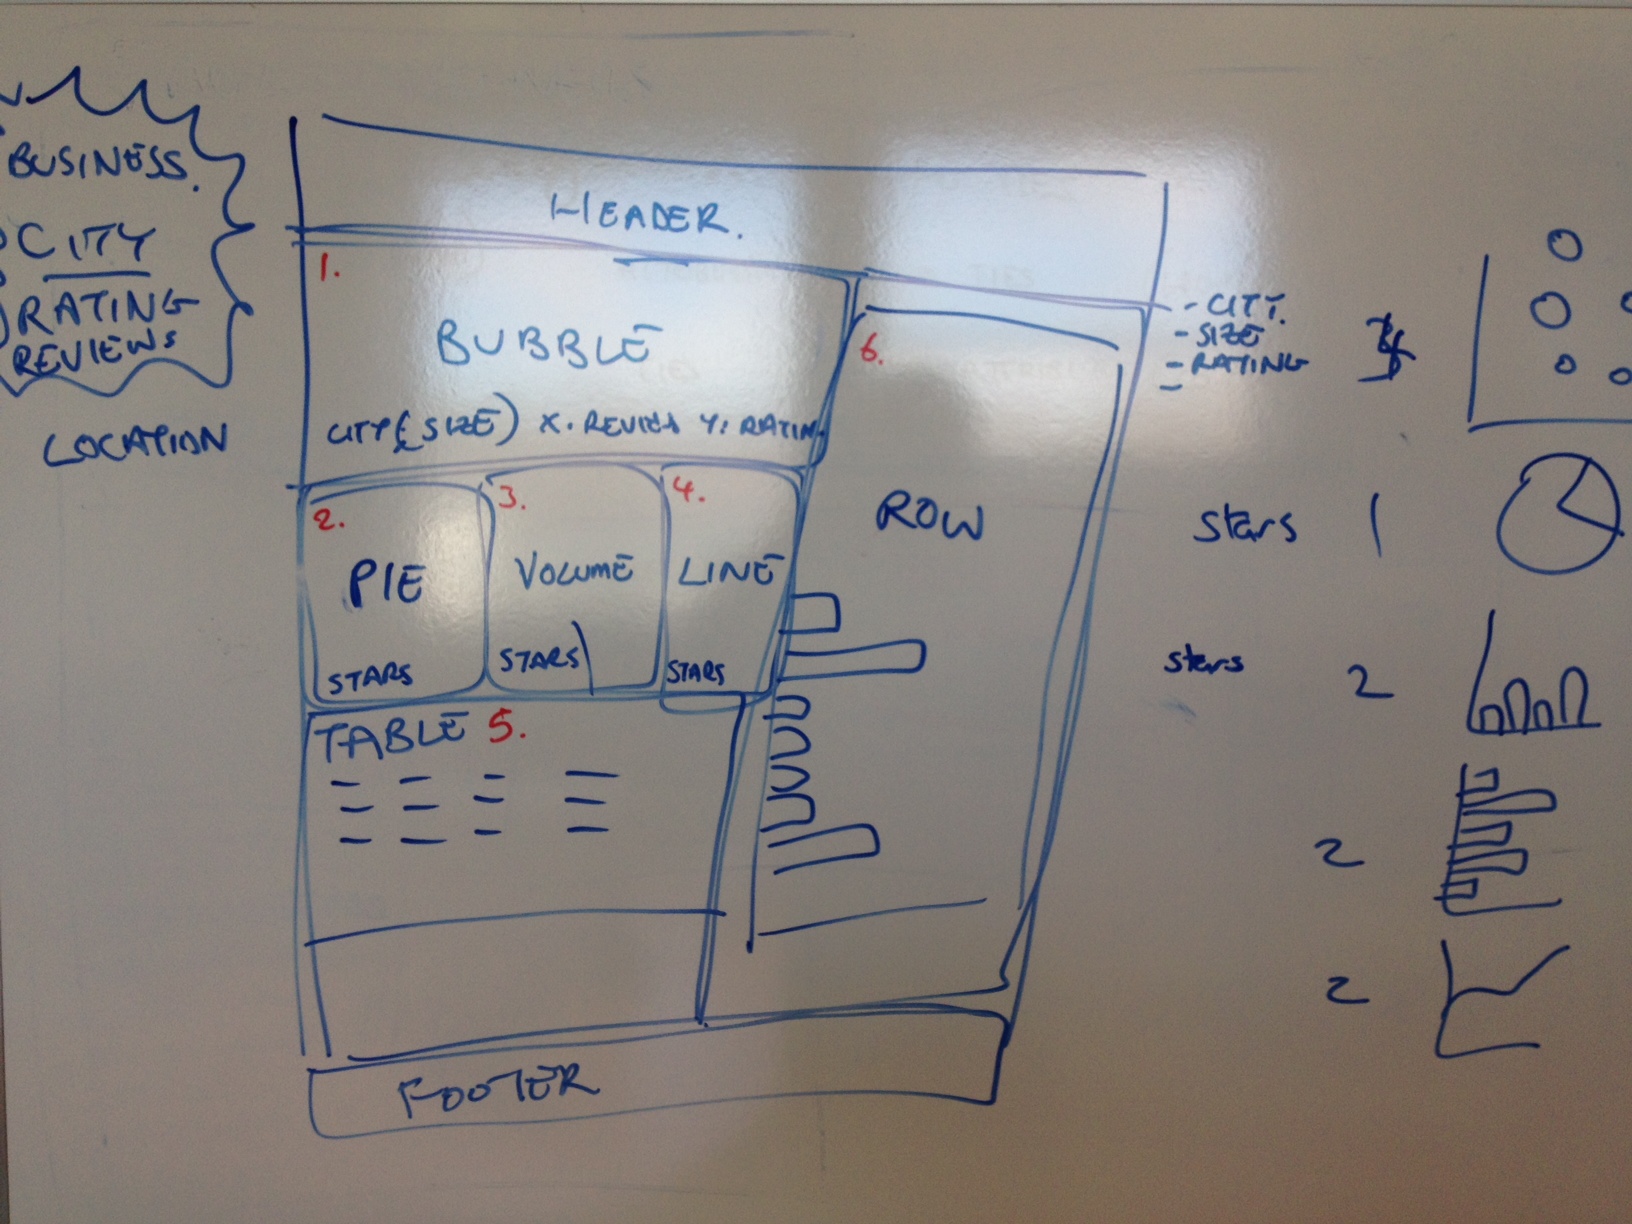
After a little whiteboard brainstorming, we arrive at something that looks like the below. The numbers (marked in red) refer to the following visualisations (note a secondary objective here was to use many visualisations):
- Bubble chart (bubble = city, bubble size = number of businesses, x-axis = avg. review per business, y-axis = average stars)
- Pie Chart (% of businesses with each star count)
- Volume Chart / Histogram (average rating in stars / # of businesses)
- Line Chart (average rating in stars / # of businesses)
- Data Table (business name, city, reviews, stars, location – link to map)
- Row Chart (# reviews per city)
(Step 4) Iteratively Implement Visualisation
This next step is iterative. This is the process by which we implement our rough sketch into our visualisation. This is achieved through a three step process.
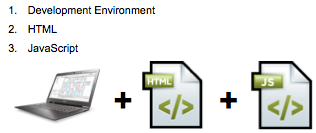
Implementing our visualisation (Step 1) – Development Environment Setup
- In a new folder create index.html (with “Hello World” inside) , simple_vis.js
- Copy yelp data & components* (js/css) into subfolders (“data” (.json), “javascripts” (.js), stylesheets (.css)
- Start web server (mongoose.exe) from folder (or “python -m htttp.server” if on mac)
- Open browser to url localhost:8080 (test that it is working)
- Open javascript console
<!DOCTYPE html>
<html lang='en'>
<head>
<meta charset='utf-8'>

<script src='javascripts/d3.js' type='text/javascript'></script>
<script src='javascripts/crossfilter.js' type='text/javascript'></script>
<script src='javascripts/dc.js' type='text/javascript'></script>
<script src='javascripts/jquery-1.9.1.min.js' type='text/javascript'></script>
<script src='javascripts/bootstrap.min.js' type='text/javascript'></script>

<link href='stylesheets/bootstrap.min.css' rel='stylesheet' type='text/css'>
<link href='stylesheets/dc.css' rel='stylesheet' type='text/css'>

<script src='simple_vis.js' type='text/javascript'></script>
</head>
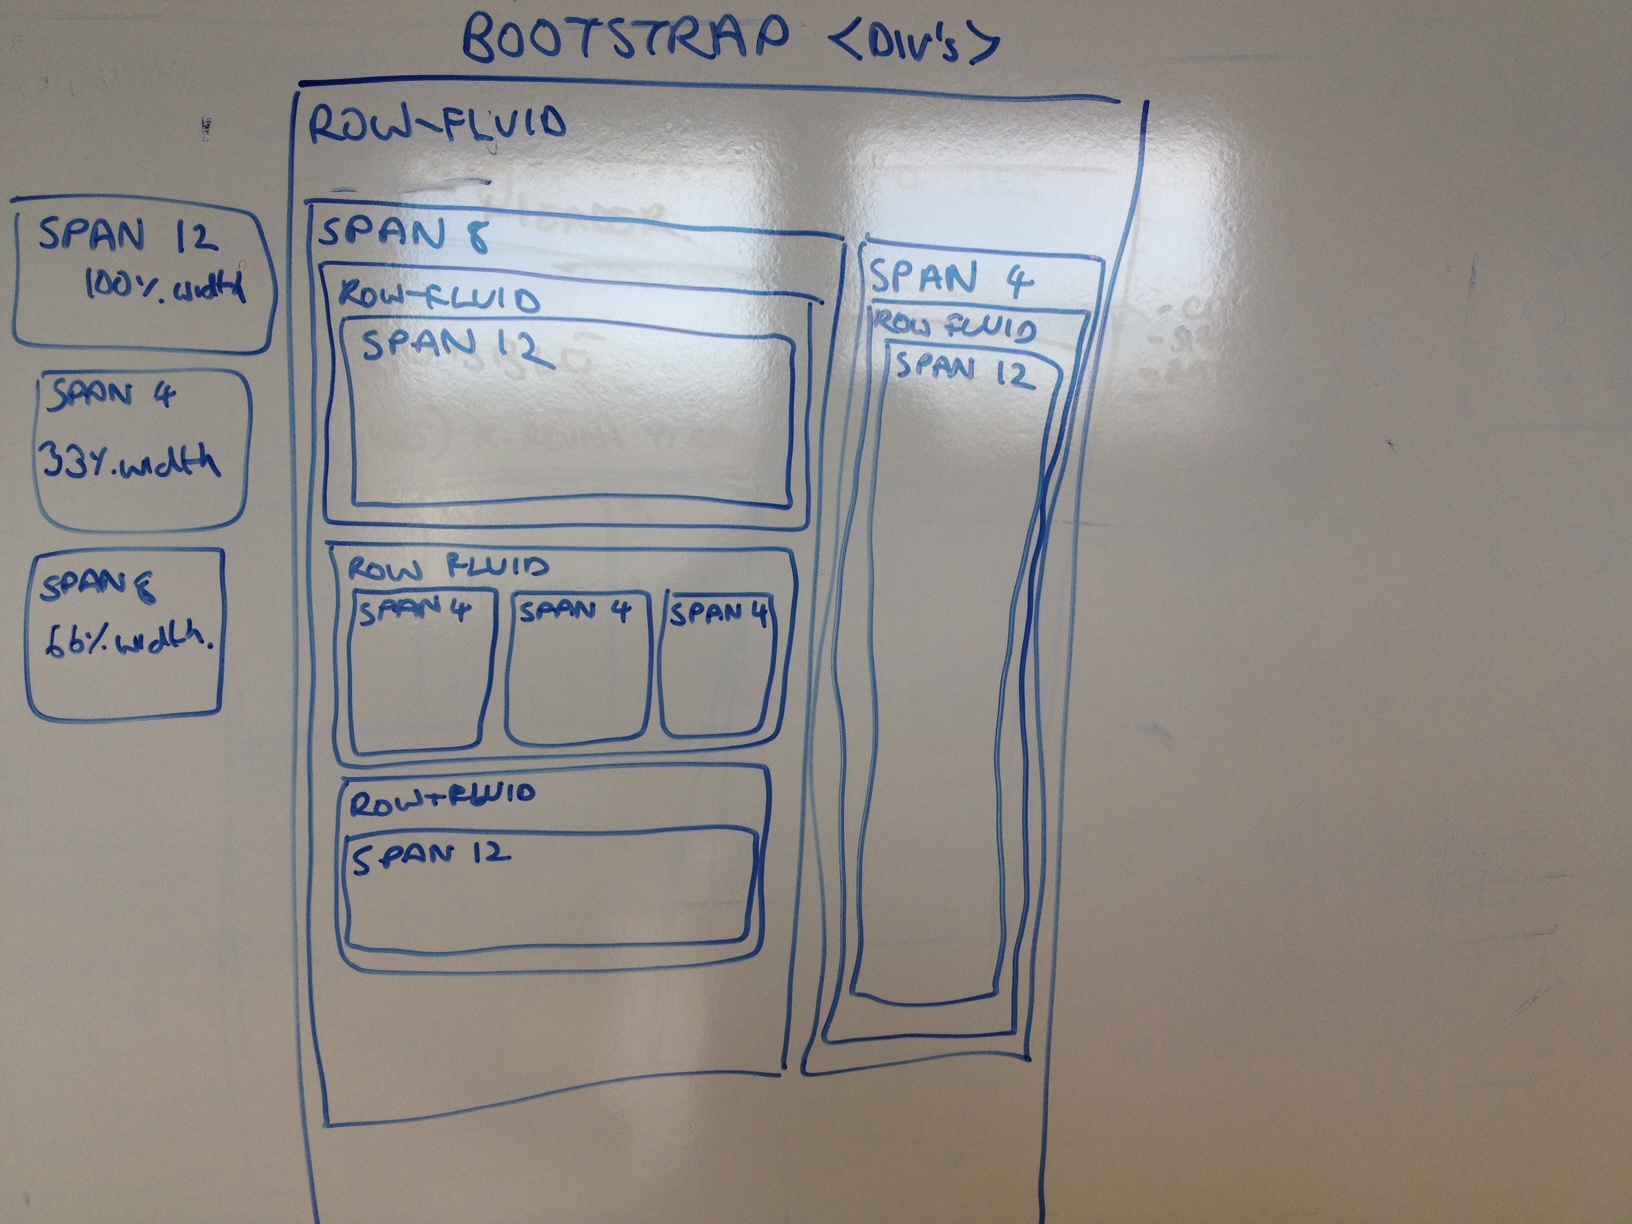
When we’ve translated this layout to html, it looks like the. Each div in the code below refers to a box in the diagram above (and nested div’s are boxes within a box – it’s that simple!). Also note that we have given each of our span div’s an id attribute to indicate the visualisation that will go into it (e.g. line 12 <div class=’bubble-graph span12′ id=’dc-bubble-graph’>. The reason for doing this will become apparent when we look at the javascript later.
<body>
	<div class='container' id='main-container'>
		<div class='content'>
			<div class='container' style='font: 10px sans-serif;'>
				<h3>Visualisation of <a href="http://www.kaggle.com/c/yelp-recruiting">Kaggle Yelp Test Business Data</a> set (using <a href="http://nickqizhu.github.io/dc.js/">dc.js</a>)</h3>
				<h4>Demo for the <a href="http://www.meetup.com/Dublin-Data-Visualisation/">Dublin Data Visualisation Meetup Group</a></h4>
				<div class='row-fluid'>
					<div class='remaining-graphs span8'>
						<div class='row-fluid'>
							<div class='bubble-graph span12' id='dc-bubble-graph'>
								<h4>Average Rating (x-axis), Average Number of Reviews (y-axis), Number of Business' (Size)</h4>
							</div>
						</div>
						<div class='row-fluid'>
							<div class='pie-graph span4' id='dc-pie-graph'>
								<h4>Average Rating in Stars (Pie)</h4>
							</div>
							<div class='pie-graph span4' id='dc-volume-chart'>
								<h4>Average Rating in Stars / Number of Reviews (Bar)</h4>
							</div>
							<div class='pie-graph span4' id='dc-line-chart'>
								<h4>Average Rating in Stars / Number of Reviews (Line)</h4>
							</div>
						</div>
						<!-- /other little graphs go here -->
						<div class='row-fluid'>
							<div class='span12 table-graph'>
								<h4>Data Table for Filtered Businesses</h4>
								<table class='table table-hover dc-data-table' id='dc-table-graph'>
									<thead>
										<tr class='header'>
											<th>Name</th>
											<th>City</th>
											<th>Review Score (in Stars)</th>
											<th>Total Reviews</th>
											<th>Location</th>
										</tr>
									</thead>
								</table>
							</div>
						</div>
					</div>
					<div class='remaining-graphs span4'>
						<div class='row-fluid'>
							<div class='row-graph span12' id='dc-row-graph' style='color:black;'>
								<h4>Reviews Per City</h4>
							</div>
						</div>
					</div>
				</div>
			</div>

		</div>
	</div>
</body>
</html>
Implementing our visualisation (Step 3) – Javascript Coding
Perhaps the most difficult part to grasp, the JavaScript coding is completed according to the following steps:
- Load Data
- Create Chart Object(s)
- Run Data Through Crossfilter
- Create Data Dimensions & Groups
- Implement Charts
- Render Charts
The code for this is clearly commented below.
/********************************************************
*														*
* 	dj.js example using Yelp Kaggle Test Dataset		*
* 	Eol 9th May 2013 						*
*														*
********************************************************/

/********************************************************
*														*
* 	Step0: Load data from json file						*
*														*
********************************************************/
d3.json("data/yelp_test_set_business.json", function (yelp_data) {

/********************************************************
*														*
* 	Step1: Create the dc.js chart objects & ling to div	*
*														*
********************************************************/
var bubbleChart = dc.bubbleChart("#dc-bubble-graph");
var pieChart = dc.pieChart("#dc-pie-graph");
var volumeChart = dc.barChart("#dc-volume-chart");
var lineChart = dc.lineChart("#dc-line-chart");
var dataTable = dc.dataTable("#dc-table-graph");
var rowChart = dc.rowChart("#dc-row-graph");

/********************************************************
*														*
* 	Step2:	Run data through crossfilter				*
*														*
********************************************************/
var ndx = crossfilter(yelp_data);

/********************************************************
*														*
* 	Step3: 	Create Dimension that we'll need			*
*														*
********************************************************/

	// for volumechart
	var cityDimension = ndx.dimension(function (d) { return d.city; });
	var cityGroup = cityDimension.group();
	var cityDimensionGroup = cityDimension.group().reduce(
		//add
		function(p,v){
			++p.count;
			p.review_sum += v.review_count;
			p.star_sum += v.stars;
			p.review_avg = p.review_sum / p.count;
			p.star_avg = p.star_sum / p.count;
			return p;
		},
		//remove
		function(p,v){
			--p.count;
			p.review_sum -= v.review_count;
			p.star_sum -= v.stars;
			p.review_avg = p.review_sum / p.count;
			p.star_avg = p.star_sum / p.count;
			return p;
		},
		//init
		function(p,v){
			return {count:0, review_sum: 0, star_sum: 0, review_avg: 0, star_avg: 0};
		}
	);

	// for pieChart
    var startValue = ndx.dimension(function (d) {
		return d.stars*1.0;
    });
    var startValueGroup = startValue.group();

	// For datatable
	var businessDimension = ndx.dimension(function (d) { return d.business_id; });
/********************************************************
*														*
* 	Step4: Create the Visualisations					*
*														*
********************************************************/

 bubbleChart.width(650)
			.height(300)
			.dimension(cityDimension)
			.group(cityDimensionGroup)
			.transitionDuration(1500)
			.colors(["#a60000","#ff0000", "#ff4040","#ff7373","#67e667","#39e639","#00cc00"])
			.colorDomain([-12000, 12000])

			.x(d3.scale.linear().domain([0, 5.5]))
			.y(d3.scale.linear().domain([0, 5.5]))
			.r(d3.scale.linear().domain([0, 2500]))
			.keyAccessor(function (p) {
				return p.value.star_avg;
			})
			.valueAccessor(function (p) {
				return p.value.review_avg;
			})
			.radiusValueAccessor(function (p) {
				return p.value.count;
			})
			.transitionDuration(1500)
			.elasticY(true)
			.yAxisPadding(1)
			.xAxisPadding(1)
			.label(function (p) {
				return p.key;
				})
			.renderLabel(true)
			.renderlet(function (chart) {
		        rowChart.filter(chart.filter());
		    })
		    .on("postRedraw", function (chart) {
		        dc.events.trigger(function () {
		            rowChart.filter(chart.filter());
		        });
			            });
		    ;


pieChart.width(200)
		.height(200)
		.transitionDuration(1500)
		.dimension(startValue)
		.group(startValueGroup)
		.radius(90)
		.minAngleForLabel(0)
		.label(function(d) { return d.data.key; })
		.on("filtered", function (chart) {
			dc.events.trigger(function () {
				if(chart.filter()) {
					console.log(chart.filter());
					volumeChart.filter([chart.filter()-.25,chart.filter()-(-0.25)]);
					}
				else volumeChart.filterAll();
			});
		});

volumeChart.width(230)
            .height(200)
            .dimension(startValue)
            .group(startValueGroup)
			.transitionDuration(1500)
            .centerBar(true)
			.gap(17)
            .x(d3.scale.linear().domain([0.5, 5.5]))
			.elasticY(true)
			.on("filtered", function (chart) {
				dc.events.trigger(function () {
					if(chart.filter()) {
						console.log(chart.filter());
						lineChart.filter(chart.filter());
						}
					else
					{lineChart.filterAll()}
				});
			})
			.xAxis().tickFormat(function(v) {return v;});

console.log(startValueGroup.top(1)[0].value);

lineChart.width(230)
		.height(200)
		.dimension(startValue)
		.group(startValueGroup)
		.x(d3.scale.linear().domain([0.5, 5.5]))
		.valueAccessor(function(d) {
			return d.value;
			})
			.renderHorizontalGridLines(true)
			.elasticY(true)
			.xAxis().tickFormat(function(v) {return v;});	;

rowChart.width(340)
			.height(850)
			.dimension(cityDimension)
			.group(cityGroup)
			.renderLabel(true)
			.colors(["#a60000","#ff0000", "#ff4040","#ff7373","#67e667","#39e639","#00cc00"])
			.colorDomain([0, 0])
		    .renderlet(function (chart) {
		        bubbleChart.filter(chart.filter());
		    })
		    .on("filtered", function (chart) {
		        dc.events.trigger(function () {
		            bubbleChart.filter(chart.filter());
		        });
			            });


dataTable.width(800).height(800)
	.dimension(businessDimension)
	.group(function(d) { return "List of all Selected Businesses"
	 })
	.size(100)
    .columns([
        function(d) { return d.name; },
        function(d) { return d.city; },
        function(d) { return d.stars; },
        function(d) { return d.review_count; },
		function(d) { return '<a href=\"http://maps.google.com/maps?z=12&t=m&q=loc:' + d.latitude + '+' + d.longitude +"\" target=\"_blank\">Map</a>"}
    ])
    .sortBy(function(d){ return d.stars; })
    // (optional) sort order, :default ascending
    .order(d3.ascending);
/********************************************************
*														*
* 	Step6: 	Render the Charts							*
*														*
********************************************************/

	dc.renderAll();
});
After completing the steps above, we are left with something like this (also hosted here).
(Step 5) Observe Users interacting
Perhaps the most important step. If a visualisation is to be useful, it must first be understood by the user and (as this is interactive), encourage the user to explore the data.
In this step what we’ve trying to achieve is to watch a user familiar with the context interact with the visualisation and look for cues that tell us something is working for them (e.g. listed for things like ‘Paradise Valley has a high number of average reviews’ or ‘There are relatively few low reviews in Phoenix, and those all seem to be hardware stores’). If your interactive visualisation is working well, often you will see user spot a macro trend ‘Low review in city XXX’ and confirm why this is by click-filtering ‘City X has many cheap thrift stores, which I know get low reviews’.
You’ll know your visualisation is not working if some fact does not suprise, delight or appear to prove a user’s hypothesis.
(Step 6) Refine, Test, Release
Following Step 5, we want to improve on the visualisation. Depending on how well it worked these changes might be cosmetic (the colour scheme confused the user) or them might be transformational (the visualisation didn’t engage the user). This might mean returning to step 2 or step 4. If the visualisation will be refreshed with new data at regular intervals, it is often a good idea to periodically observe uses to understand if how their needs have changed having understood (and hopefully solved!) their initial data challenge. Given the users new needs, repeating the entire visualisation process again may be beneficial.
That’s It.
Phew! Well done for making it this far. The first time you read this post, a lot of it might seem new, but reviewing this in conjunction with the code in the resources file should answer questions you have.
Remember, if you can nail this (which shouldn’t take too long), you’ll be able to create neat interactive visualisation quickly and easily in many contexts (which can impress a lot of people)!
As always, comments and feedback are appreciated. Please leave them below, or on our facebook page.
